Show jumping course for training
Train Smarter with This Show Jumping Course
Jumping a show jumping course is one of the most important parts of any rider’s training routine. It allows you to recreate the types of challenges you’ll face in the competition arena, from tricky lines to related distances and combinations. But building a good training course takes experience—it’s a skill all of its own.
That’s where I can help. With over 35 years in the sport, I’ve designed countless exercises and training courses to help riders at all levels improve their confidence, accuracy, and control. You’ll find plenty of those exercises right here on the website. So, if this particular course isn’t exactly what you’re after, feel free to explore the other options available.
The good news? You don’t need a huge arena to train properly. In fact, practicing in a smaller space can be a real advantage. It teaches you to be more technical and efficient with your riding. When you get comfortable jumping in a smaller arena, everything feels easier and less rushed when you ride in a larger, open show arena.
This show jumping course is designed to help you get the most out of your space—whether you have a full-size arena or something more compact. It’s all about building confidence, developing adjustability, and refining your riding so that when show day comes, you and your horse are prepared.
Explore the course plan below and let’s get to work.
How to set up this show jumping course
Easy Arena Setup – Step-by-Step
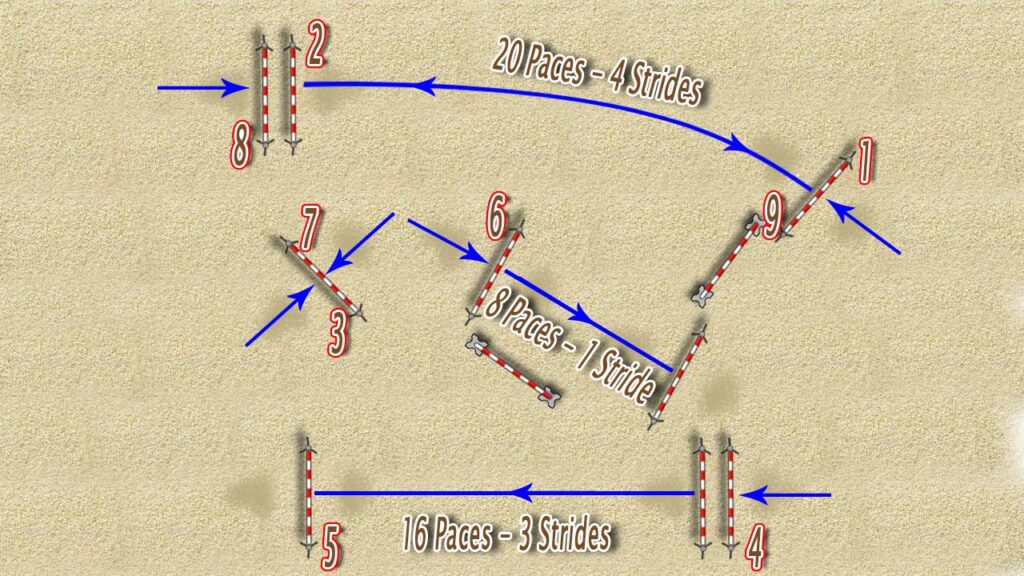
This setup is quick and simple, but it’s always worth taking a moment to plan it properly. Before you build the jumps, lay the poles on the ground and walk your lines to make sure everything fits nicely. You want smooth, flowing corners, and you don’t want your jumps crowding each other.
Step 1: Related Distance on a Curve (Top Long Side)
Along the top long side of your arena, set up an oxer to a vertical on a gentle curve. You’ll be jumping this line in both directions, so be sure the jumps are built to work both ways.
- The distance rides as 4 strides
- It measures 20 paces from the oxer to the vertical
Step 2: Related Distance on the Bottom Long Side
On the bottom long side, set up another line—this time an oxer to a vertical. Again, make sure both jumps can be jumped in both directions.
- The distance rides as 3 strides
- It measures 16 paces from the oxer to the vertical
Step 3: Angled Vertical
Next, place a vertical at an angle. Make sure you can approach and ride away from it comfortably.
Step 4: One-Strided Combination
Set up a vertical to vertical one-stride combination. Check your lines to and from this.
- Standard 8 paces between the two jumps
Step 5: Warm-Up Cavalettis
Finally, place your cavalettis or poles on the ground for your warm-up. Position them so you have a clear, easy approach.
And that’s it—your arena is ready to go!
Some of our latest exercises:
To receive more videos like this
sign-up for our weekly newsletter
You have a dog? Check out our sister site Waggley Wonders