Training for show jumping
Welcome to the sixth video in my series of ten, where I share some of my favorite exercises designed specifically for small arenas. Whether you’re just starting out or have years of experience, this exercise is a fantastic way to improve your training for show jumping, even when space is limited.
I know how challenging it can be to practice in a smaller arena. Tight turns, limited approaches, and restricted lines can make things feel tricky — but the good news is, working in a small space actually makes riding in bigger arenas feel much easier and more controlled. That’s why I love these exercises — they turn small spaces into an advantage.
This particular exercise focuses on improving three essential areas: accuracy, balance, and control. These are the building blocks of effective riding and the foundation you need to feel confident in any competitive environment.
As part of your training for show jumping, exercises like this will help you refine your lines, sharpen your reactions, and develop a more adjustable, responsive horse. It doesn’t matter if you’re preparing for your first show or working towards higher-level classes — mastering the basics in a controlled space always pays off.
So, saddle up and give this one a try. You’ll be surprised how much progress you can make, even in a small arena. Stick with this series, and by the end of these ten videos, your confidence, technique, and understanding of show jumping will be on a whole new level.
Training for show jumping video below
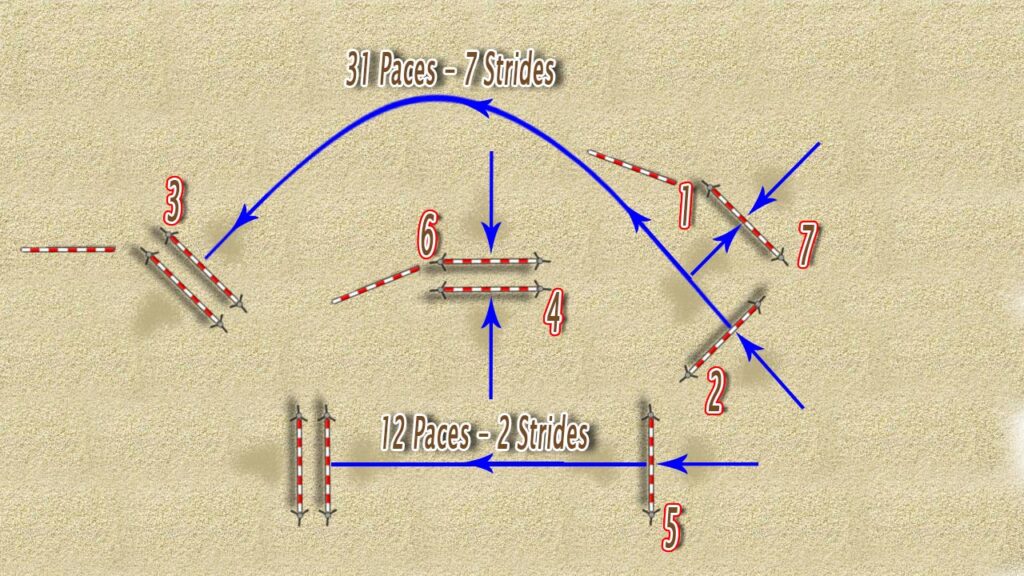
How to set this exercise up:
This is a simple, straightforward setup with just six jumps, but there are two important related distances you’ll need to measure carefully. Let’s break it down step by step.
Step 1: Double Combination (Bottom Long Side)
Start by setting up a two-stride combination along the bottom long side of your arena:
- Oxer to Vertical, measuring 12 paces, which is the standard distance for two strides.
- Nothing tricky here — just make sure it’s straight and properly spaced.
Step 2: Curved Related Distance
Next, set up a curved line, Vertical to Oxer, with 7 strides between them:
- This distance measures 32 paces, which is standard.
- If you’re jumping under 1m, it can be helpful to shorten it slightly to 31 paces.
- Be sure there’s enough space to get a good approach and ride away cleanly.
Step 3: Vertical at a Right Angle
At a right angle to the vertical from the curved line, build another vertical jump:
- This jump is designed to be ridden from both directions, so make sure you add ground lines on both sides or place one directly underneath.
- Set it at a slight angle to maximise space for your approach.
Step 4: Oxer in the Centre
Place an oxer in the centre of your arena:
- This one also gets jumped from both directions, so position it with enough space for clean approaches and exits.
Step 5: Warm-up Poles
Finally, lay down three poles down the centre of your arena:
Pay attention to the angles — they’re placed intentionally to guide your lines, not randomly scattered.
Some of our latest exercises:
To receive more videos like this
sign-up for our weekly newsletter
You have a dog? Check out our sister site Waggley Wonders